Friday, January 29, 2016
How much does my british anvil weigh?
Many english anvil are marked in the hundred weight system... we poor yanks don't seemto grasp it first try...
THere's an app for that... well a web page anyway...
Anvil weight calculator

Sunday, January 24, 2016
A Great way to make your anvil quieter.
My anvil rang lie a bell, so i got some stainless chain (no zinc to burn off an make poisonous gas)
and wrapped it around.
This way looks better, way quieter.
I'll be doing this next time.
How to test an Anvil for rebound
When you get an anvil, first you want to know is it a good anvil, or what's calle an ASO (Anvil Shaped Object)
Some places (Harborfreight in particular) sell cheap cast as anvils that just don't' work right, it's like using a piece of scrap mild steel... the hammer absorb your energy making every hammer blow do less, and the face dents and dings all the time..
How we check which it is i called a rebound test. if a hammer or a ball bearing bounces, thats' the energy of your hammer blow getting sent into your work instead of absorbed by the anvil.
More rebound = less hammer blow to do the same work..
simply put you drop the ball bearing or the head of the hammer from a specific height, then look at what % of that height it bounces on the first bounce.... 80% is a good number.
Here is a video of it being done.
Some places (Harborfreight in particular) sell cheap cast as anvils that just don't' work right, it's like using a piece of scrap mild steel... the hammer absorb your energy making every hammer blow do less, and the face dents and dings all the time..
How we check which it is i called a rebound test. if a hammer or a ball bearing bounces, thats' the energy of your hammer blow getting sent into your work instead of absorbed by the anvil.
More rebound = less hammer blow to do the same work..
simply put you drop the ball bearing or the head of the hammer from a specific height, then look at what % of that height it bounces on the first bounce.... 80% is a good number.
Here is a video of it being done.
Friday, January 1, 2016
Tools you can make with a welder that will be a huge help, if you also have a vice.
So if you have a vice a welder (or a buddy with one), and some way to cut metal, you cam make these awesome tools that will help your metal bending immensly.
The first is just a set of simple bending forks, what' s cool is, yon can adjust these to make any
size bend in any stock. Want a tight bend, set it so the bar barely fits between the pins. Want a loosere on , play with the distance between them, or make lots of small bends close together, it will average out to a larger smooth bend...
Make two pieces that look like this
Put them in the vice and adjust the distance to fit.

Make another one of the two parts above replacing the round pin with a square one, that's 1/4 , 3/8 or 1/2 and you can pop a socket of the matching wrench size, on the square one and use it to get a precisely sized larger bend (get some old black oxide or un coated sockets for this, as it will probably ruin the temper.

you will also want one of these to fit into your anvil, or honestly several with different sized bars and spaces.. they go into and out of the hardy quickly and leave the vice open for other operations.
The best way to make hardy tools is to forge them, second best is to get square solid bar the size of your hardy and weld them up
but cheap and easy is to get 1" square tubing from the hardware store and use it to weld them up, if you hardy is smaller than 1" you just squeeze the tubing liek this till it fits, then weld it onto your tool to be the hardy post.


Weld a stem to fit in your hardy hole on the threaded bit and one of these is darn handy
https://youtu.be/c7E0kUPcvzM
Some Very Simple Tong Designs, for guys who can't make the ones ususally taught yet, or want to build confidence.
When I first started blacksmithing every time I tried to make tongs, they never looked at all like the ones in the lessons.. It was pretty disheartening... One of the main mistakes I was doing was using too thin stock, because I was trying to avoid drawing out the reigns by hand... but ever since I've looked for really basic (but not pretty) tongs that you should be able to make day one... You might say I'm slightly obsessed about it, if you go look at the Tongs Summary Page I had to make, just to keep track of all my tong related posts... Probably because I'm still pretty bad at making pretty tongs..
These instructions are for basically very visual people, (like me) if you don't get them, at the bottom of this page is a link to Jock Dempsy style Forge and twist tongs, that is very detailed, so try that.
Here are a few workshop sheets and photos of tongs slightly more advanced than the EZ boy Scout tongs, I showed how to make before... Make a pair of those first, before you this first pair, as they are very similar.
EZ/BSA Style tong with forged reigns:

What I really like about BSA tongs and other tongs make from bar stock, is that one pair of these can be used to hold any size flat stock.. just heat up the jaws of the tong, and grab the bar, a few taps with a hammer and the jaws squish or bend to fit the barstock... They are weaker than better fancier tong designs, but this is a handy feature.
Next are tongs that I prefer, because you can do all the bending on a bending fork, making it super simple to get nice clean tight bends... I came up with these on my own and then later found this awesome worksheet someone else made using the same technique. The only thing I would do different from this is make the bends, and _THEN_ make the flat spot where the the rivet will go (the boss).. Try it both ways, see which you like better.
Bending fork and bar swedge tongs:
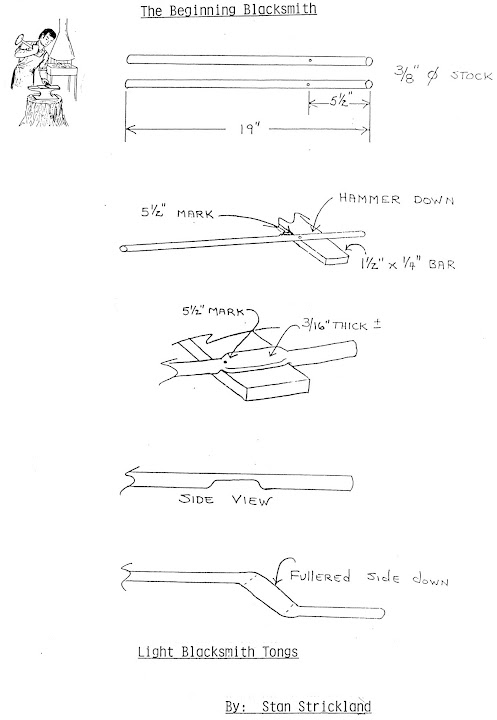

3/8 stock is still a little light for tongs that can do anything, but I really prefer using light tongs when
the strength of the big ones are not needed, it's just sooooo much easier to manipulate them. Most of the tongs I make are like these, or like the Cut and Weld Tongs. I make my cut and weld tongs using 3/8 bar for handles, they work OK for light stuff.
Variant on the last tongs
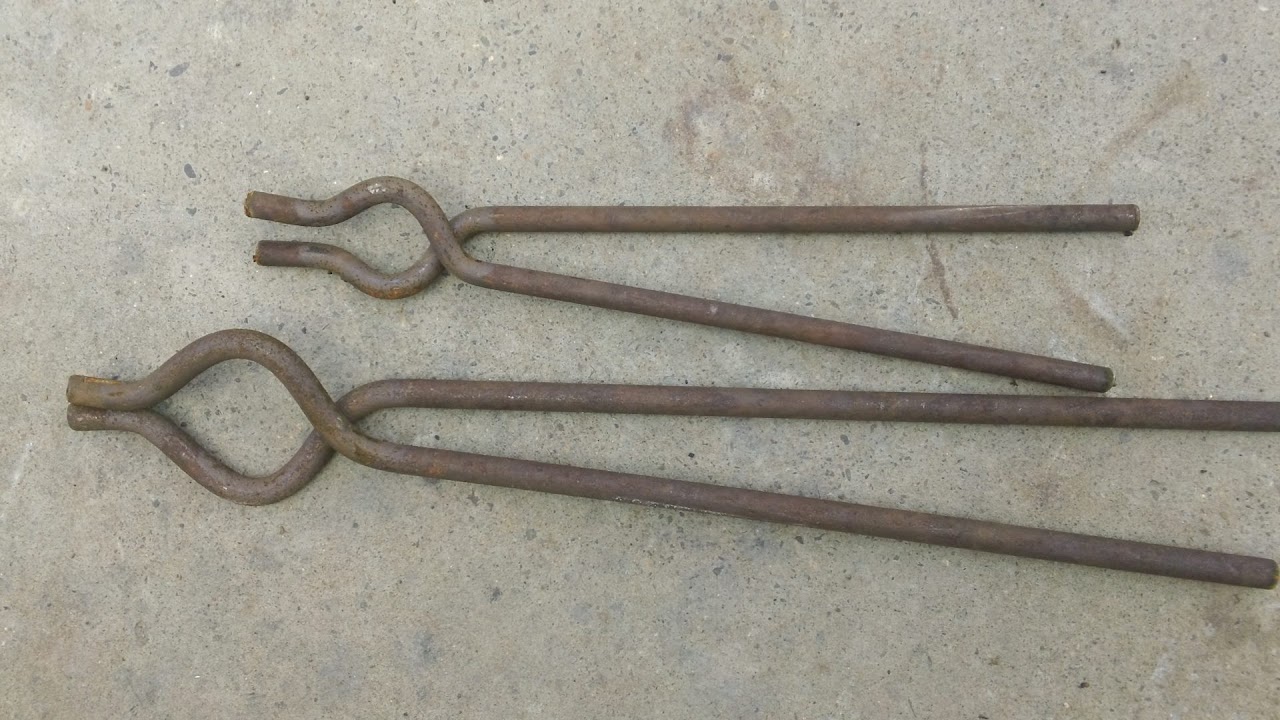
Next up is a variant on the last one, instead of just making a Z shape, then doing the boss, on these you do all the shaping you can on the bar, then flatten the boss, and then do the jaw.. I don't' have a worksheet, just as pic of tongs that are all bent up ready for the next step, but if you've make a pair of the Stan Strickland tongs above, you'll get it after looking at the photo.
A totally different approach.
I have not made these yet, as they required heavier stock than I have.. but I think these will be easy, and are next up on my to do list.. Again, no step by step, but i was able to figure out the steps just by looking at this in progress picture.

Here is my guess on the steps.
1. Cut your round stock to length, 18 or so inches is my guess, 3/8" or 1/2" stock, maybe have to upset to 3/4 first...
2. Forge one end into a flat taper, like on screwdriver, but leaving the end pretty thick
3. Set a large fuller on the anvil, put the tongs edge down on them and hammer till a dent is put in half way.. Stop every few hits on the swedge to flatten the taper back into shape.
After that it's just like Jock Dempsey style forge and twist tongs. speaking of which, Here is an awesome step by step tutorial on Dempsey Style forge and twist tongs, the ones I'll try after these above.
I hope this helps you learn to make a few pairs of tongs.
Wednesday, December 30, 2015
Lesson learned about forging fire steels
So I whipped up a couple fire steels out of garage door spring I had lieing around.
Hardened them up like the dickens... tempered the handle all the way down.. left the striking part hard.. and they didnt' work for crap...
Looked at the one I bought on line.. the whole striking surface was ground smooth and shiny.. and the edges of the striking surface were slightly rounded.
Looked at mine.. the striking edge was wavy lumpy, square and covred in forge scael
Went and ground mine smooth, no lumps, rounded the edges (careful not to let it get to hot to touch, or change colors) on both my steels, now they spark better than the one bought online!
Booyah!
Building a Darn Frosty's Tee Burner
So I'm trying to build a Frosty's Tee Burner...
Let me start off by saying I'm a reasonably tool savvy guy, I do black smithing, work on my own car, make armor, weld, have all the normal wood working tools, and a few specialized metal tools, like a mini metal lathe...
That said, for a burner that's supposed to take 20 min and cost $20, sure as hell isn't. Mostly it's because of tools i needed to buy, wrong tools, tools not working how I expected (IE drill bit I had was to long to fit on lathe once tee was chucked up etc., etc...) It's been nothing but tiny steps forward, followed by heading to the internet to buy another part.
So I'm putting this blog post together to document the process so you can learn from my mistakes... and to link the exact parts I'm buying for each step... So you don't get the wrong ones...and maybe to earn enough in referrals to by myself a free black Smithing book once a decade or so. :D
So if I can I'll link to amazon..
First off, here is the exact Tweeco Mig tip I ordered... I'll let you know if it works, as the .035 tips I had for my harbor freight flux Mig welder did not (The welder is long gone, but the tips are still here)
$1 Prime shipped tweeco mig tip
This is one tip, but a pack of 10 from other places are $18... so order several
Tee Fittings:
I've ordered 4 different tee fittings online and every single one has been the wrong type where the "straight line" fittings are 1" & 3/4" and the 90degree fitting is 1"... IE The kind you need for make a side arm burner, but not the kind you need for a tee burner...
Wrong kind: 3/4" left, 1" up (or down) and 1" Right
(Image is for shape, ignore the sizes on the pictured fittings)


Right kind: 1" left, 1" right, 3/4 down(or up).
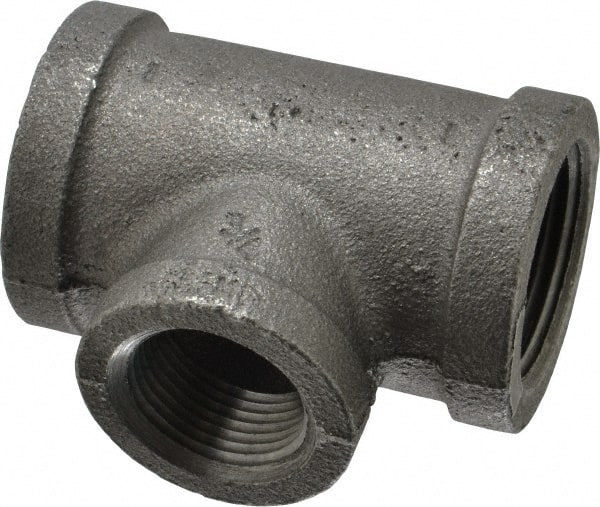
So my advice is, just go to a plumbing supply place where you can be sure you got the right one..If I find a place where I can get the correct ones I'll link to them. Ordering them Prime shipped from Amazon is roughly $10 each...
You need to be aware that I'm not following Frosty's plans exactly, I'm replacing the copper flare fittings with short runs of copper pipe and propane quick connectors, to match my existing forge..
After I use a part and it's the correct part and works I'll add it to the list here at the Bottom:
Steps I've done so far.
Ordered wrong tee fitting #1
Ordered wrong tee fitting #2
Bought correct Tee fitting at plumbing store in person
Bought a bunch of parts on amazon
Tried to put correct tee fitting into my mini metal lathe, didn't fit ordered close pipe nipple to chuck up and screw fitting onto.
Chucked up close nipple to put te onn to drill hole in center of tee fitting... Hole NOt drilled in center of tee fitting.
Ground a Flat spot on tee fitting, so bit will not wander to drill off center hole... Test fit before drilling this time... bit not on center of tee fitting. Adjusted close pipe nipple to it's properly centered
Don't use close pipe nipple, as the screw thread is tapered.. Making it a huge pain to get straight
Get a longer fitting and cut it in half so you can chuck it up on the pipe not the threads... fording it to chuck up straight the first time
Failed parts
Be
aware the common 1/4" tap is 1/4-20, not 1/4-28, I pulled the 1/4 in
tap out of my tool box, double checked the instructions,
it tapped fine but then hole tapped was too large for the mig tip,. Wound up going with the straight frosty desing to get fittgins that would tap correctly
Verified Correct Parts:
Note: this did not fit the tap handle I had that the other tap fit into... You need a larger capacity tap handle
UN Verified Parts:
Be careful, the normal 1/4 in tap, is 1/4-20, not 1/4-28, that's another trip to Amazon for me!
Tweeco is the Magic word on the mig tips, the ones i had around the shop did not fit... back to the internet!
My current choice of the correct Tee Fitting
The secret appears to be 1X1X3/4 not 1X3/4X1, at least the one pictured is correct.
I ordered one from Amazon to test this theory. I'll let you know how it comes out.
This has several virtues, 1 it has a valve already in it, that valve on my current forge is super handy. #2 if something goes wrong my the new forge I can quickly disconnect the propane. #3 easy to unhook to move around and swap forges for testing. #4 The cheap Chinese forge I got on ebay many years ago, came with this on it...(Boy I wish I could get another one.. $160, with regulator & hoses.. been a great little forge)
It fits fine, just not moving it till I fire up the burner.
The one on my cheap Chinese forge came with a gauge and a needle valve, this one is cheaper and comes with a braided hose, I'll let you know how it works out.
Subscribe to:
Posts (Atom)