When I first started blacksmithing every time I tried to make tongs, they never looked at all like the ones in the lessons.. It was pretty disheartening... One of the main mistakes I was doing was using too thin stock, because I was trying to avoid drawing out the reigns by hand... but ever since I've looked for really basic (but not pretty) tongs that you should be able to make day one... You might say I'm slightly obsessed about it, if you go look at the Tongs Summary Page I had to make, just to keep track of all my tong related posts... Probably because I'm still pretty bad at making pretty tongs..
These instructions are for basically very visual people, (like me) if you don't get them, at the bottom of this page is a link to Jock Dempsy style Forge and twist tongs, that is very detailed, so try that.
Here are a few workshop sheets and photos of tongs slightly more advanced than the EZ boy Scout tongs, I showed how to make before... Make a pair of those first, before you this first pair, as they are very similar.
EZ/BSA Style tong with forged reigns:

What I really like about BSA tongs and other tongs make from bar stock, is that one pair of these can be used to hold any size flat stock.. just heat up the jaws of the tong, and grab the bar, a few taps with a hammer and the jaws squish or bend to fit the barstock... They are weaker than better fancier tong designs, but this is a handy feature.
Next are tongs that I prefer, because you can do all the bending on a bending fork, making it super simple to get nice clean tight bends... I came up with these on my own and then later found this awesome worksheet someone else made using the same technique. The only thing I would do different from this is make the bends, and _THEN_ make the flat spot where the the rivet will go (the boss).. Try it both ways, see which you like better.
Bending fork and bar swedge tongs:
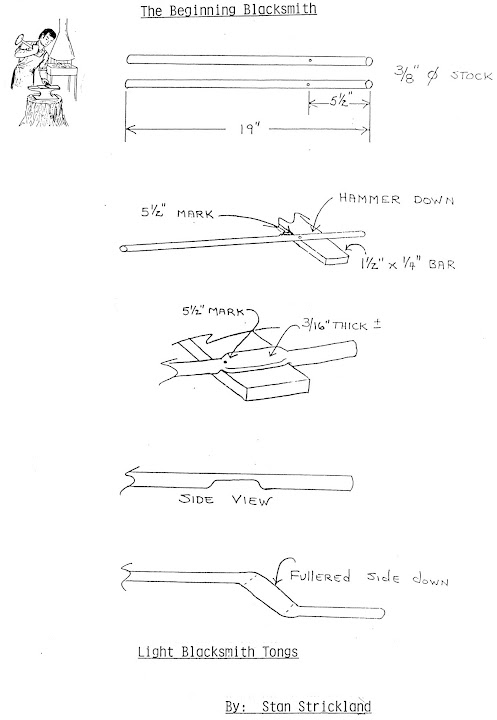

3/8 stock is still a little light for tongs that can do anything, but I really prefer using light tongs when
the strength of the big ones are not needed, it's just sooooo much easier to manipulate them. Most of the tongs I make are like these, or like the Cut and Weld Tongs. I make my cut and weld tongs using 3/8 bar for handles, they work OK for light stuff.
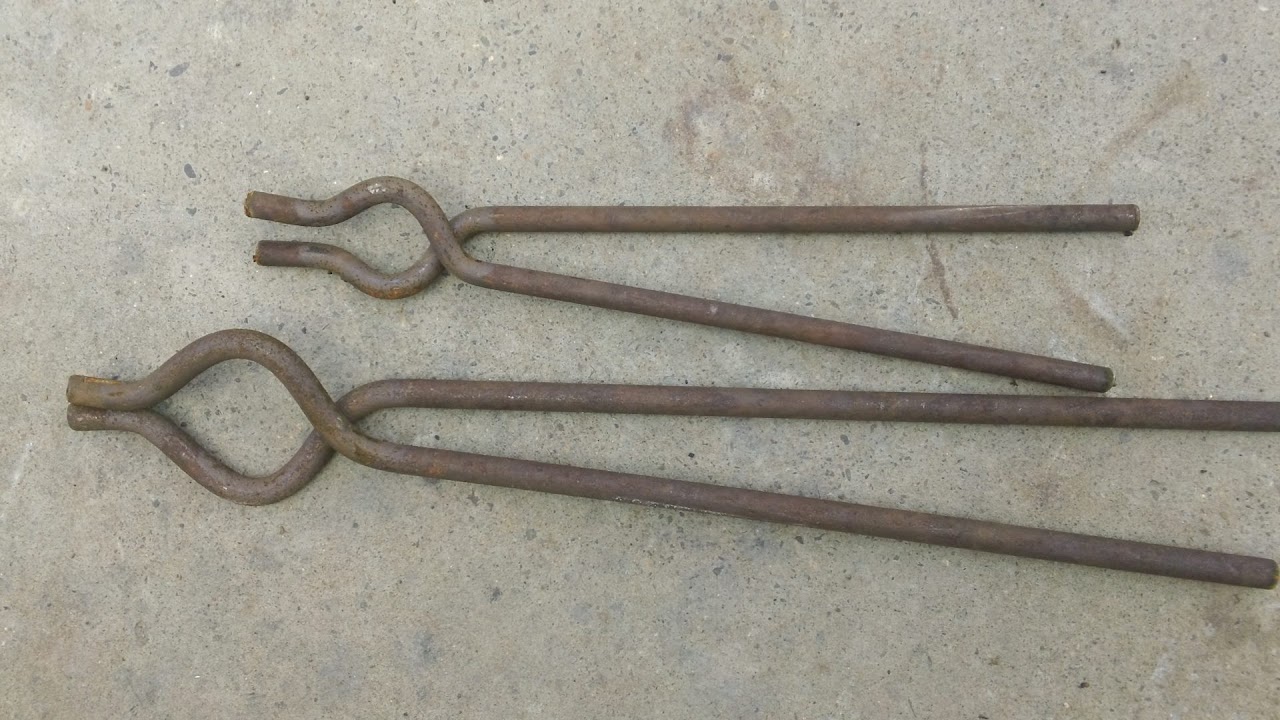
Variant on the last tongs
Next up is a variant on the last one, instead of just making a Z shape, then doing the boss, on these you do all the shaping you can on the bar, then flatten the boss, and then do the jaw.. I don't' have a worksheet, just as pic of tongs that are all bent up ready for the next step, but if you've make a pair of the Stan Strickland tongs above, you'll get it after looking at the photo.
A totally different approach.
I have not made these yet, as they required heavier stock than I have.. but I think these will be easy, and are next up on my to do list.. Again, no step by step, but i was able to figure out the steps just by looking at this in progress picture.

Here is my guess on the steps.
1. Cut your round stock to length, 18 or so inches is my guess, 3/8" or 1/2" stock, maybe have to upset to 3/4 first...
2. Forge one end into a flat taper, like on screwdriver, but leaving the end pretty thick
3. Set a large fuller on the anvil, put the tongs edge down on them and hammer till a dent is put in half way.. Stop every few hits on the swedge to flatten the taper back into shape.
After that it's just like Jock Dempsey style forge and twist tongs. speaking of which, Here is an awesome step by step tutorial on Dempsey Style forge and twist tongs, the ones I'll try after these above.
I hope this helps you learn to make a few pairs of tongs.
I wanted to say how important it is to plan, draw and then make your tools. Many people start out with good intentions, but quickly fall short. If you take your work or hobby seriously, then learn to draw . Scale drawings or full size. Most make patterns for many of their projects and save them. My shop had hundreds of them. This process will teach you thru practice how to make quality tools. Good show!!!! Mark The Blacksmith Co-op, Inc. Middleboro- Ma. wear safety euipment, protect your eyes and front. An apron, boots,it is not sissy if you get burned,
ReplyDeleteI wanted to say how important it is to plan, draw and then make your tools. Many people start out with good intentions, but quickly fall short. If you take your work or hobby seriously, then learn to draw . Scale drawings or full size. Most make patterns for many of their projects and save them. My shop had hundreds of them. This process will teach you thru practice how to make quality tools. Good show!!!! Mark The Blacksmith Co-op, Inc. Middleboro- Ma. wear safety euipment, protect your eyes and front. An apron, boots,it is not sissy if you get burned,
ReplyDelete